

After my last epic post about Floral Heart, the last thing you probably want to read is another epic post about an embroidery project, but here we go again! ;) Honestly, I meant to blog this project as I was working on it, but before I knew it the deadline was only a few days away and I only JUST managed to finish in the nick time!
The Flickr group New Embroidery with Vintage Patterns, who hosted the contest my Floral Heart won its category in, also organize non-competitive monthly SALs (Stitch Alongs) with different themes each month. For April 2013, there were two themes to choose from, "Earth Day" and "April Showers", and I chose the latter :)
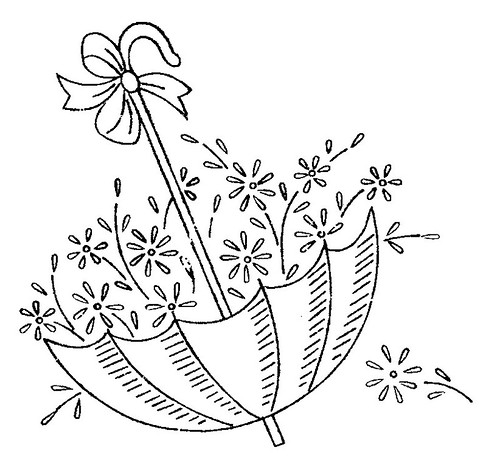
The only requirement is that you have to use a vintage pattern, the rest (materials and techniques) is up to you! Serendipitously, I had favourited this lovely umbrella, shared by mmaammbr, in the Hoop Love Vintage Transfers group some time ago:
I knew I wanted to try applique, so the stitching was less intensive this time. But I kept putting it aside for other things and just squeaked in on the last day, April 30th!
Because of the time limit, I had to post some photos of my finish on Flickr first, but that won't be an normal thing, so worry not! I have lots of new details to share :)
I've already covered how how I transferred my pattern with a blue Sulky Transfer Pen in detail, so this post will cover the process of appliqueing and stitching!
A word of warning: this is going to be another very long post with lots of pictures!
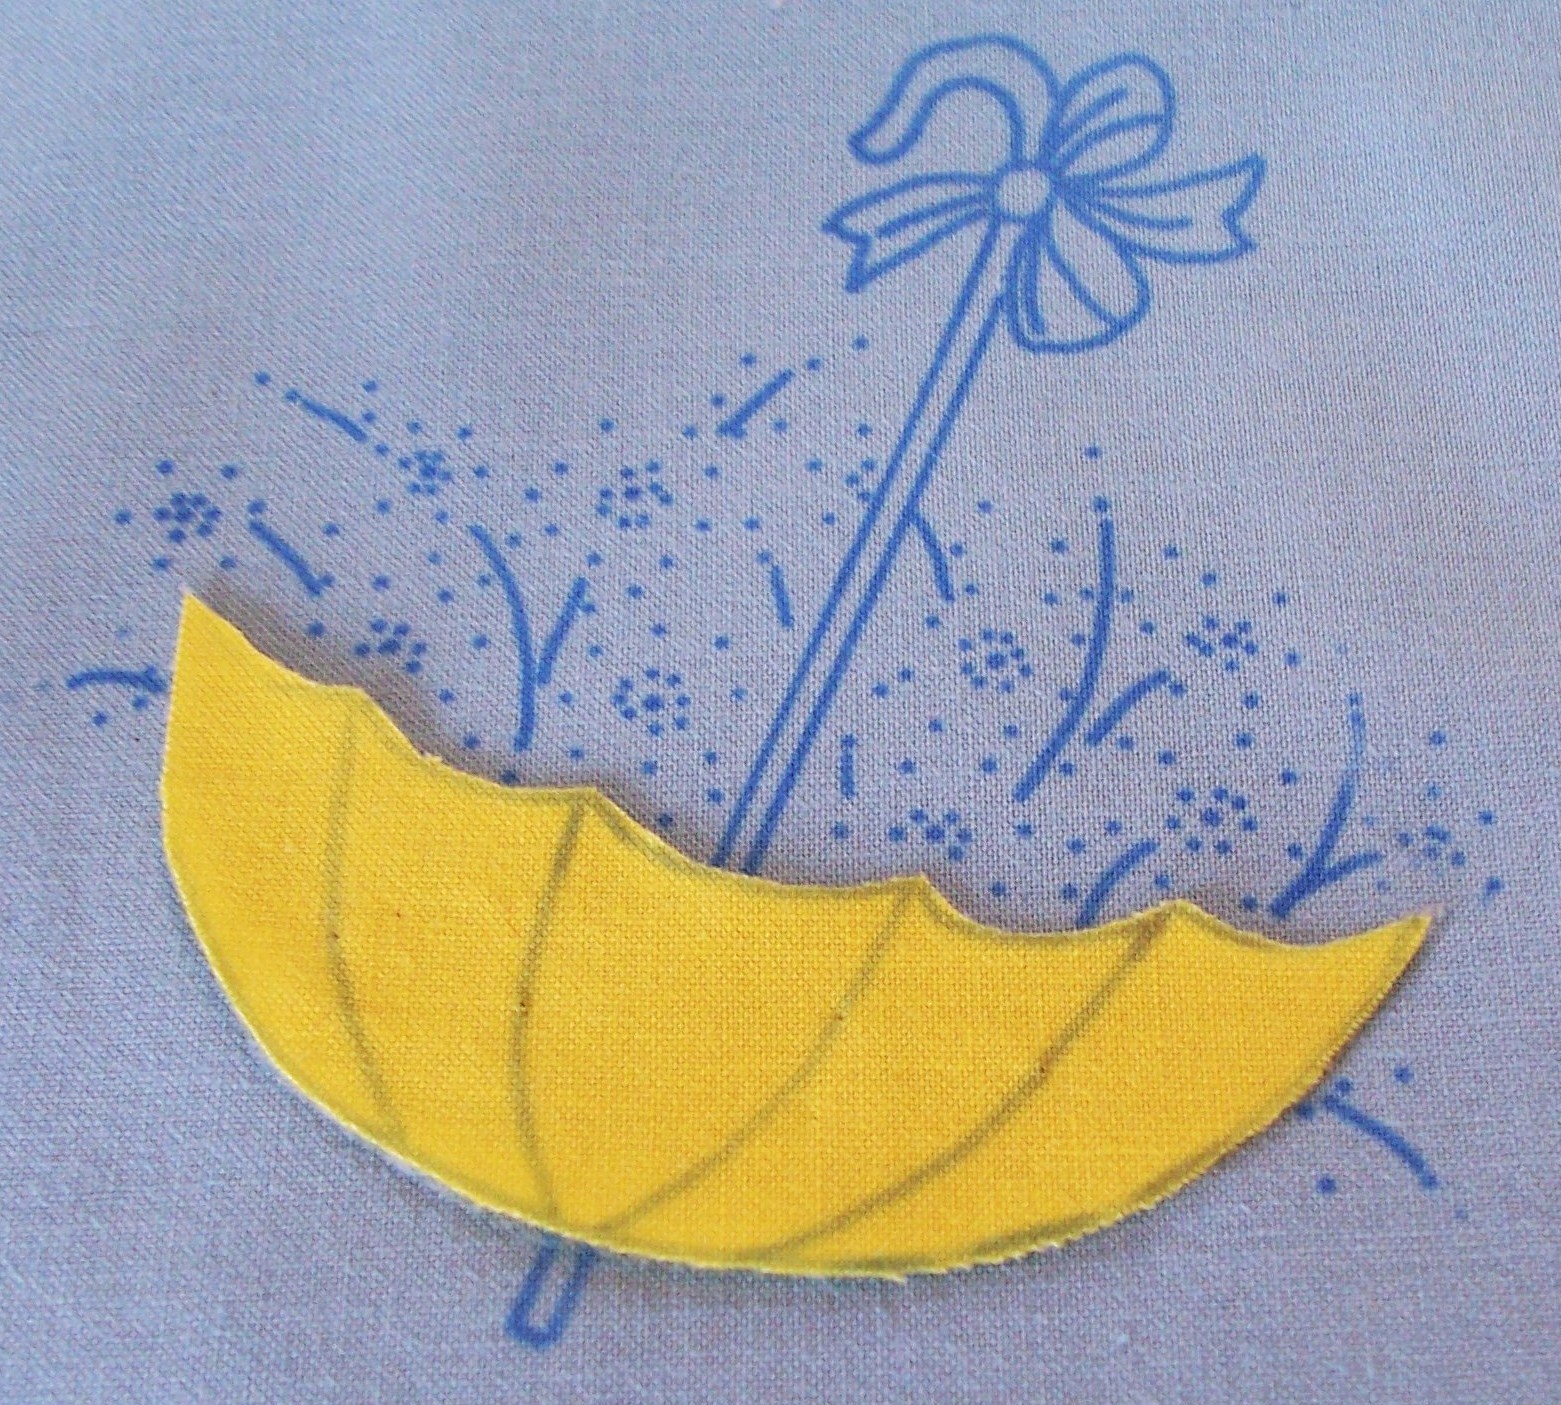
This is where we left things after the last post, with both parts of the umbrella - the background blue fabric and the yellow umbrella - transferred and ready to be joined together. At first, I intended to sew the applique on by hand, but my Stitchy Guru Mother strongly suggested using an iron-on interfacing called "Stitch Witchery".
I had seen her use it in projects in the past, but had no experience with it myself. My Stitch Witchery was made by commercial company HTCW Inc., which is now HTC Retail, sold by the meter in sewing supply stores (I got mine from Fabricville).
Confusingly, there is also another product sold under this name made by Dritz, the quilting company, who have merged with Prym. This is a tape used for binding hems.

Here is the product as it comes, with the instructions wrapped in the middle. The complete copy of these instructions are available on the HTC site (direct .PDF link here). The product info for Stitch Witchery states: "It is a polyamide fusible web material that permanently bonds two layers of fabric together without sewing."
Here is the piece I cut off from from the bottom to cut the umbrella section out of, laid against some dark paper so you can see the texture:

And here is that same little bit doubled over itself, so you can see how sheer the webbing is and how it goes nearly opaque layered over itself:

I realized after the fact that I should have trimmed this snippet to a neater shape, but honestly I really dislike to waste fabric on anything and I really am that nippy, LOL :) I trimmed the umbrella applique to size, and pinned it to the Stitch Witchery. Then I used a little pair of sharp sewing scissors to carefully trim the webbing to shape.
Here it is after the trimming:

Now, the cool part is that you only have to take out the pins, line up your applique and webbing, lay both layers in place on your backing fabric, cover with a light dry pressing cloth (to protect your iron's surface and your transfers), and then iron it on! And, once again, the actual process was so super-quick that I didn't even manage to get a picture. I was sure that the edges would lift off a little, but it took right away!

(This photo looks turquoise because I took it in direct sunlight - oops!)
I was really impressed with this product, I really do think it is wondrous! In the same time it takes to do an iron-on transfer - a mere half a minute! - you can permanently layer fabrics together! I'm not a natural iron user, having to hold such a hot surface always makes me nervous. But the iron-on Sulky Transfer Pens and the iron-on Stitch Witchery are both well worth trying, for ease of use and lasting results!
I've always thought that applique was very fiddly, but this process results in an even finish from edge to edge. I did have some very slight lift in the top left corner of the umbrella, but since I didn't notice it until I started stitching I left it alone. I wasn't concerned because I knew I'd be stitching through the edge of the applique, but you will want to check your edges for lift if you aren't planning to sew them down.

Then all I had to do was hoop up! I used my 8" Hoopla for this project. I also didn't bother to serge the ends of my fabric since this was a quick stitch, and the edges will be cut off anyway in finishing. To my surprise, the fabric held up well and I really didn't have any major problems with the edges unraveling!

This photo was taken at the end of stitching (and meant to be cropped, please excuse the lack of background), and you can see that there was very little fraying!
Before I get into the nitty gritty details about the stitches I used, I want to mention the materials I worked with, especially the thread which was new to me:
As I mentioned previously, the fabric I used is blue 100% cotton, the same material I used for my Bluebirds of Happiness, and the yellow I used for the umbrella applique was also 100% cotton. If I were to do this again, I would use a heavier cotton or add a stabilizer (a lining fabric or interfacing) because the heavy fill stitches stretched the cotton in places. You can see it in this photo, on the left between the pink flowers:

Thankfully I was able to cover most of the stretching with the leaves, but it was very difficult. Part of the problem was that the thread I used - DMC's Prism Craft Thread - stitched up a little heavier than I expected, especially in the flowers.

This thread is meant for friendship bracelets, but I fell in love with the pretty colours in the "Sweets" package above (the green and beige came from the "Rockstar" pack)! It is twisted like DMC Perle (Pearl) Cotton but without the shine, with a matte finish like flower thread. I'm going to do a review post of my experiences with it soon.
Both packs have 36 skeins, with "Sweets" having three skeins of each colour and "Rockstar" having more of a mix. The nine colours I used were as follows:
In "Sweets": Yellow, Blue, Dark Pink, Peach
In "Rockstar": Green and Beige
In both "Sweets" AND "Rockstar": Lilac, Light Pink and White
For stitching, I used my new favourite Clover needles, the large Gold Eye Chenille Needles in #20. For this project, I was most interested in adapting the filled daisy technique I had discovered while stitching my Floral Heart to smaller flowers and coloured threads, and the ribbon bow is also an adaptation of the one from FH.

So because I already knew how I wanted to stitch most of the piece, and was okay with improvising the rest, I didn't use test pieces this time around. While I think testers are really helpful for trying out new techniques and materials, there is something to be said for spontaneous stitching as well :) It was fun to just go for it!
Case in point: The umbrella. I wanted a relatively thick outline. As I mentioned in my other post, I had left out the lines between the umbrella ribs that was in the original transfer. These were supposed to add shading, I think, but I was undecided about them. However, I knew that if I did add them to the design, I was going to use simple straight stitch, and I wanted a thick outline to contrast.
Once I had experimented and discovered a stitch combination that I was happy with (really, I just kept adding layers until I liked the result!), I grabbed my camera to try and show the process. So in the pictures that follows, the lower curve of the umbrella is already worked, and it is the top line that will show the changes.
I decided on Chain Stitch as my outline, but I felt it was too open:

So I worked a line of Backstitch inside of the Chain Stitch:

And then I whipped the Backstitch (making it Whipped Backstitch):

This was better, but still too messy, so then I whipped the Chain Stitch too!:

And here is the finished umbrella, with the ribs worked too:

Can you see that I changed the direction of the whipping on the ribbing?:

To "whip" a stitch just means to wrap your thread around it! So I kept wrapping from the same direction all along the outside of the umbrella. But when it came time to stitch the center ribs, I thought it would be neat to keep the whipping symmetrical, so I did the two ribs on either side in the opposite direction from each other. Only the right two ribs are stitched differently - I wrapped from the left instead of from the right. It's a subtle touch, but I think it fools the eye and adds a bit of dimension.
There is officially a Whipped Chain Stitch, but I don't think this is really how you're supposed to work it. But hey, it's a variation! I love that you can do that :) I haven't the faintest idea what to name this stitch though, any suggestions?!
After I finished the umbrella, I moved on to it's handle, reasoning that the flowers might overlap it. I started off by stitching the teeny tiny spoke at the bottom:

It's a very good thing I did, because I had to cut out this element twice!
First, I tried filling the middle with Padded Satin Stitch and outlining it in Backstitch. The idea was to make the handle stand out in a little half-circle and have it look three-dimensional. One layer didn't make any difference, and two layers just made the inside of the applique look really flat. So I restitched it in plain Satin Stitch and outlined it in Backstitch, which I Whipped to echo the umbrella outline:

The hardest part was the crook at the top:

As you can see from this angle, I had to overlap the stitches tightly in the center to get around the curve, and I discovered that it is much harder to curve Satin Stitch in small spaces without padding! The slightest overlap shows up, which is very vexing.
However, once I had the handle finished, I happily turned to the flowers! This is what I was most eager to experiment with, after the applique, and as I mentioned above, I simply scaled down the technique I developed for Floral Heart.
I think I might call this variation the Upsy Daisy, since the padding adds so much height, LOL :) But the center just wasn't working. Here is the first flower I stitched:

It wasn't too bad, but I didn't like it. So I moved over to the other side of the handle and stitched my second flower, this time only using a French Knot in the center:

You can see that the center of the pink flower looks a little bulkier than that of the lilac flower. But when seen from an angle:

That little becomes A LOT. If I had loved the look, I might have kept it. But I didn't.

So out it came! I used my embroidery scissors to carefully cut under the outer loop and the knot, and teased the threads out to save wear on the fabric.

Much better, right?! I did three wraps for each French knot.

Here's the Before and After, side-by-side:

There was still a gap between the flower and the center, but I planned to fill that later on with a Detached Chain Stitch, as I had done previously, but instead of whipping the tacking stitches I intended to keep them plain. Which I actually did (gasp!) ;)
Just for fun, here's the new side view:

And here are all the flowers worked:

I initially intended to use the dark violet and the dark peach too, but I decided they were too heavy. I would like to say that I noticed that there were five daisies on each side of the handle and that I plotted them out accordingly, but the truth is that I just stitched them randomly. I started with the bigger eight-petaled flowers first, leaving the two half flowers above the spokes until last, and when they were done, only then did I move on to the six-petal ones! I like the way the colours turned out though :)

As you can see from the close-up above, I did wrap the centers of the large flowers with the same colour, and besides filling in the gap this served another purpose: it helped the two half-flowers stand out from the umbrella! Because their centers were right up against the spokes, all you could see was a lot of yellow! So the little bit of colour helps them to stand out, as you can see with the peach flower above :)
The next logical step would have been to stitch the leaves, but at this point I only had three days left until the deadline, so I decided to tackle the most intensive stitching first, which was the ribbon bow. Although much smaller than the one in FH, it also had more detail packed into a very small space, in the form of inner loops which had to be filled and a center line running down each end:

I started with the inner loops, which I decided to stitch in beige to make them looked "shadowed". The beige was an unexpected addition, since at first I planned to stitch using only the pastels in the "Sweets" Prism pack. But I just couldn't do mint green leaves, no matter how truly vintage that would be, so I broke down and bought the "Rockstar" pack for the green threads. Happily, the beige was also in the pack, so I added it to what was supposed to be an all-white bow, and I'm so glad I did because that little bit of shading is what makes the bow work! Here it is:

The inner loops were worked in plain Satin Stitch, but every other part of the bow was worked in Padded Satin Stitch. When it came to the lines in the bow and the ribbon ends, I padded around these with straight stitches so that there would be a little furrow that I could later stitch through. For the bow loops, I used a single Long Stitch in the middle, which lay gently on top of the stitches:

And for the ribbon ends, I used a line of Backstitch, which I pulled tightly, so that it was close to the fabric, to make the dimension provided by the padding more visible:

And then I outlined the little dot in the center:

For this, I used close Couching, aka Straight Outline Stitch (a variation of regular Outline Stitch, which is worked at a 45-degree angle), an adaptation of the ribbon center from FH. This ribbon bow was the hardest part of Floral Umbrella because there were a lot of stitches so closely packed together - by the end, I was having trouble pulling my needle through! You can see that the fabric puckered a little on the left. The outline of the center was not as smoothly rounded as I would've liked, but it was the best I could manage. Here's what it looks like from the side:

And here it is with the flowers, all ready for the leaves:

When I chose the pattern, I had a vague idea about downsizing the Oyster Stitch to see how small I could get it, but after the flowers were finished, I decided I wanted something very simple that wouldn't detract from the detail of the petals. So the leaves were stitched completely spontaneous - I threaded my needle with green and just went for it! I used stem stitch for the stems (naturally, LOL) and the leaves are simply a Lazy Daisy (Detached Chain Stitch) with a smaller Lazy Daisy inside:

To do this, I placed my first Lazy Daisy, making the tacking stitch a little bit longer than normal and leaving some slight slack in the loop, and then I came up right inside the bottom of the Lazy Daisy, passed my needle through the bottom of the tacking stitch, and brought it back down next, making the inner loop! Both loops lie flat, and the inner loop adds colour and depth without added bulk.
This combination ended up being my second-favourite discovery during this project (the first being the Umbrella outline stitch), as it's so simple and fast! I honestly don't know why this isn't more common. I don't know what to call this stitch either, though, maybe the Double Daisy?! It's definitely a combination I'll be trying again :)
I think it would make nice small flower petals too, perhaps with a Backstitch down the middle for added shape. Here's the leaves "growing" over to the other side:


Here's all the greenery, except for the sprigs, in place:

I left the sprigs on either side until the end, and I ended up extending them slightly and moving the leaves further out on the stem (I think it adds a better balance):

All finished! And here, because I know you're curious!, is the back of the work:

Embroidery really differs from cross-stitch here - in cross-stitch, we are taught never to carry our colours, to end and start each section anew. In embroidery, that just isn't possible most often and so you have to wrap your threads around others to move from stitch to stich! I've also learned to leave a little stubby tail when I cut my threads so that if I need to take out that element, I'll know where it starts and ends. Not cutting them too close also prevents unraveling.
The overall result is a little messy, but I'm starting to get used to it! I've always been a firm believer that it is better to firmly anchor and darn threads than it is to worry about "excess" thread on the back, and this is doubly true for embroidery, where a loose end might mean stitches coming loose too! It's a USEFUL mess, LOL ;)
Now, if you're still reading, I applaud you! You deserve yet *another* pretty shiny metal for sticking it out this far, but since I don't have any at hand to give, I'm afraid you'll have to settle for some more pictures instead (oh, the hardship!):
Starting from the top down, the ribbon bow and three large flowers:

Here's some close-ups of the small flowers and leaves:

For a different perspective, here's a tilted view from the bottom:

Here's another one from the side:

And VOILA! - here we are back at the start again!
There you have it! As we all know, April Showers bring May Flowers, and "Anything That's Green and Grows!" is the theme of the May 2013 NEwVP SAL (you may have to sign up to Flickr to see the discussion), although I think I'm sitting this month out. However, there's lots of time left if you'd like to stitch up something small yourself :)
Any ideas about what I should name the Umbrella outline stitch combination?!
6 comments:
Amazing work! I love seeing your process.
I really want to see if I can get my hands on some of the Prism Craft Threads, now.
Very pretty! Stitch Witchery certainly does make the applique process a whole lot easier. I love the double daisy and the outline on your umbrella was very ingenious of you! It turned out wonderfully! Sorry, but I don't have any idea what to name the stitch lol... I'm not very good at such things. :)
Thank you both for sticking it out until the end! :)
@ Emma: I'm so glad you enjoyed yet another tour through my silly scattered stitchy thoughts, LOL :) And what a happy coincidence - there may be a little giveaway coming up soon (shh)!
@ Karen: Yes, this SW is amazing stuff! If you haven't tried it yet, it's totally worth experimenting with, and not that expensive. My umbrella stitch is so VERY happy to be called ingenious, you flatterer you! *blushes on its behalf* I rather think it's happy being a one-off one-of-a-kind sort of deal anyway ;)
(P.S. Mr. B. Floofy protests that you ARE very good at naming things - he's very happy with his initial!)
I love this! Every last bit of it. The yellow applique? Yes. The extra thick lines? Yes, yes. The dimension and fill? Yes, yes, yes!
I added this to my Lovely Embroidery board on Pinterest, but if you'd rather that I remove it, please let me know.
Mollie, thank you so much for your wonderfully kind comment :) I admire your work so much, you do beautiful embroidery, and I really appreciate that you've taken the time to stop by!!! I'm very flattered you've Pinned me, thanks very much for that too ;)
I want videos in this embroidery
Post a Comment